Quick start / Table of Contents
1. LCIF Program and EOI Overview: This section provides general information about the LCIF program and the LCIF Stream 2 Technology Demonstration EOI content and process. Please note that this Service is not valid for LCIF Stream 1 Technology Validation projects, which are expected to be accepted later in the fall of 2017.
2.futureInnovate Platform Tips: This section describes important features of the online platform that applicants should be aware of prior to completing and submitting an EOI.
3. Registration: This section provides step-by-step instructions on registering to use the LCIF Stream 2 Technology Demonstration EOI Service provided by futureInnovate.net.
Online Registration || Step-by-step detail
4. Logging in: This section provides step-by-step login instructions to log into the LCIF EOI Service once registered.
5. Entering your EOI content: This section provides instructions to enable an Applicant to complete a LCIF EOI using the LCIF EOI Service. The EOI consists of six parts. Each part must be completed separately. With responses prepared in advance, Parts 1 through 6 can normally be completed online in about 1.5 to 2 hours.
Step-by-step detail || Advance detail on Parts 1-6 input requirements
6. Reviewing your draft completed LCIF EOI: You may access your draft LCIF EOI and also download a PDF version to enable review by you and your colleagues.
7. Reviewing and Submitting your FINAL completed LCIF EOI: This section describes the final steps for submitting the LCIF EOI.
8. Support: This section provides email links for help with the LCIF EOI and technical support for the LCIF EOI Service.
1. LCIF Program and EOI Overview
These instructions describe the process for completing and submitting an Expression of Interest (EOI). The information collected through the LCIF EOI will inform decisions about proceeding to submission of a full Business Case for the LCIF Program. Information provided should be sufficiently detailed to allow reviewers to make firm decisions. At any time, the Ministry may request additional information or clarification. The responses received by the Ministry from an Applicant shall, if accepted by the Ministry, form an integral part of the Applicant’s EOI. Your application will be reviewed based solely on the information provided in the EOI. You may contact a ministry advisor prior to submitting your EOI application in the event there is any doubt about the information requirements.
The EOI service is completely separate from the LCIF Self-Assessment Service. You must update your registration to add the LCIF EOI Service, and proceed to complete an submit an LCIF EOI as described in these instructions.
Before completing the EOI, applicants are strongly encouraged to read the LCIF Programme Guidelines and the Submission Guidelines (will open a pdf file in a new window).
Disclaimer
Please note that this program is a discretionary and non-entitlement program. As such, notwithstanding that the applicant has submitted a complete application and met all program criteria, there is no guarantee that the applicant will proceed to the next Phase or be awarded funding. Without limiting the generality of the foregoing, the applicant acknowledges that if an applicant submits a Proposal, the Ministry is under no obligation to approve funding.
Confidentiality
Please note that the Ministry is subject to the Freedom of Information and Protection of Privacy Act. The act provides every person with a right of access to information in the custody or under the control of the Ministry, subject to a limited set of exemptions. Section 17 of the act provides a limited exemption for third party information that reveals a trade secret or scientific, commercial, technical, financial or labour relations information supplied in confidence, where disclosure of the information could reasonably be expected to result in certain harms. Any trade secret or any scientific, technical, commercial, financial or labour relations information submitted to the Ministry in confidence should be clearly marked. The Ministry will provide notice before granting access to a record that might contain information referred to in Section 17, so that the affected party may make representations to the Ministry concerning disclosure.
The applicant is advised that the names and addresses of grant recipients, the amount of grant awards and the purpose for which grants are awarded is information the Ministry makes available to the public.
For more detailed information on the program please refer to the LCIF Programme Guidelines.
You may also view the content of an initial presentation and QA session that took place on August 29, and a question and answer session on September 12, 2017.
EOI Overview
The EOI online process involves five steps, each of which is described in a separate section below.
- Registration for the LCIF EOI Service – see Section 3
- Logging in to the LCIF EOI Service – see Section 4
- Entering your LCIF EOI content – see Section 5
- Reviewing your draft completed LCIF EOI – see Section 6
- Reviewing and Submitting your final completed LCIF EOI – see Section 7
Submission Deadline: All completed EOIs must be received by the Ministry via online submission no later than Sunday, September 24, 2017 at 11:59 pm. Late and/or incomplete EOIs will not be accepted. A complete EOI must be submitted by the deadline in order for the applicant to be eligible to submit an LCIF Business Case under Phase 2.
LCIF EOI Required Inputs: To assist you in preparing to enter your application data, click here to access detail on Parts 1-6 input requirements. (opens in a separate window).
2. futureInnovate Platform Tips
The online platform supporting the LCIF EOI Service is provided by futureInnovate.net.
Email Communications: Automated email communications from the futureInnovate platform have as return address “noreply@secure.futureinnovate.net”. Communications from our tech support platform have as return address “support@smartzone.futureinnovate.net”. If you are expecting a reply and do not receive one, check your email spam filter.
Browser: For optimum performance, use a reasonably up-to-date standards-compliant web-browser. Javascript must be turned on and your browser should accept popups from the futureInnovate pages. Best viewed with screen resolution of at least 1024×768.
Navigation: Use the “Next”, “Previous” and other navigation buttons at the bottom of each page rather than the back or forward buttons on your web browser.
Timeouts: As a security measure, your session will timeout after 30 minutes of inactivity from the time you last clicked a “Next” button. If your session times out, you will need to logout and login again. In addition to inactivity, timeouts can also be caused by an interruption in network connectivity. You should save your data regularly by clicking “Next”. While your data is saved incrementally each time you click “Next”, there is no automatic save feature on timeout.
To help avoid timeouts:
- After 10 minutes of inactivity, the platform will display minutes remaining until timeout near the top of the browser page
- After 20 minutes of inactivity, the platform will popup a warning alert. Click “OK” to reset the session timer to 30 minutes
- After a timeout, the platform will popup an alert advising you to save any unsaved text input to your clipboard before you re-initiate the login process.
Text input: Where the Submission requires a text input, applicants are strongly encouraged to use a word processor to prepare responses in advance so that the pre-prepared responses can be pasted into the appropriate textboxes when completing the online forms. This is important because, as noted above, your session will “timeout” after 30 minutes of apparent inactivity. Attempting to compose the detailed text responses online may result in exceeding the timeout limit. The platform has no way of knowing that a user is actively working on a page, other than when a user actively communicates with the platform by clicking a “Next”, “Previous”, or “OK” button.
Word count limits: In cases where a word count limit is specified for an input response, the platform will display an approximate word count, which is calculated based on the number of spaces and line breaks in your text input. If you paste content into a text box and are informed that it exceeds the allowed word count, click in the text box and hold down the delete key until you are under the limit, at which time you will be able to resume normal editing.
The word count is updated based on keystrokes or clicking on the page after pasting in text. Web browsers may calculate the word count differently depending on their implementation of javascript and your browser word count may differ from the word count calculated in your word processor. The word count provided by the platform is therefore a guide only. Applicants are responsible for ensuring that their Submission content is not excessive in relation to the suggested word count guidelines. Content that exceeds the guidelines may not be taken into consideration during the evaluation process.
Required inputs and preloaded values: In order to ensure completeness of submissions, in most cases the platform requires that all fields on a page be populated in order to accept input and populate the database. If a field is not relevant, insert “NA” in text fields or “0” in numeric fields. In many cases, the platform will prepopulate fields with “NA” or “0”. Where appropriate, you should overwrite the prepopulated data with your own inputs.
Resuming work on a Submission: If you are not able to complete the Submission in a single online session, at any time you may logout, and your input to the last time you clicked “Next” will be saved automatically. You can return later and continue as described in Step 3.6.
Checking Completion Status: The Main Menu includes a “Status Summary” option. At any time, you may select this and click “Next” to view a summary of the completion / submission status of each Submission associated with your user account, and obtain draft or final submission pdfs if these have been generated.
Multiple users: Only one individual should be logged into a user account. It is not recommended to have more than one individual logged in on the same user account.
Documentation: For additional information, you may access the futureInnovate user documentation / frequently-asked questions or client documentation.
Online Platform Terms and Conditions: Applicants should note that they remain bound by the terms and conditions for the online platform.
3. Step 1: Registration to use the LCIF EOI Service
A person who wishes to submit a LCIF EOI must register as a user of the LCIF EOI Service and must also register each EOI they plan to submit.
Registration is a 2-3 minute process and has two parts. The first part (User Registration) involves creating a user account and subscription for the LCIF EOI Service. The second part (EOI Registration) involves setting up basic information about your EOI. Once you have completed User Registration and EOI Registration for the first time, you only need to repeat the EOI Registration process if you wish to create and submit an additional EOI.
Step 1.1: Access Registration link
To begin, click on the following Online Registration link:
Online Registration (will open in a new window)
Step 1.2: Select registration action and enter email address
If you are setting up a new user account, click on “Set up a new account for a first-time user”.
If you already have an account on the futureInnovate platform (for example, if you have previously used the platform in any other capacity), click on “Add this subscription to my existing account” and enter your email address.
If you have already registered one EOI but wish to register another one, click on “I am already registered for this service but wish to register another LCIF EOI”. You may also use this procedure to register a first EOI if the initial registration process was not completed.
Enter your email address in lower-case where prompted.
Step 1.3: Supply additional user information as requested
For a new account, you will be asked to provide your name, phone number, company name, and specify a password.
We recommend that email addresses and passwords be specified using lower-case letters only, since passwords in particular are case-sensitive. Provide a secure password that includes both letters and numerals and is at least 8 characters in length.
Step 1.4: Review and accept Terms and Conditions
You must review the terms, conditions and other requirements of the LCIF EOI, and the terms and conditions for the online platform, and signify your agreement in order to proceed further.
Step 1.5: EOI Registration
You will be asked to provide additional registration information about your organization and EOI, including specifying a name for your LCIF EOI and a short description of approximately 15 words or less. You will be notified onscreen and via email when registration is complete.
Ensure that you complete the registration process within 30 minutes. If you are interrupted, the session may timeout and your registration may not be complete.
Unless you are registering an additional EOI as described above, you only need to complete the registration process once. On subsequent visits, login as described below.
4. Step 2: Login and Specify Service
Step 2.1: Login
After completing or updating your registration, the platform will automatically direct you to the login page.
On subsequent visits, login using the following URL:
https://secure.futureinnovate.net (will open in a new window, select the platform login link)
You will need to supply your userid (i.e., your email address) and the password you specified on registration.
Passwords are case-specific.

Ensure that you use the above URL to login. If you set a bookmark for subsequent logins, ensure that your bookmark contains only the URL specified above. Your login bookmark should not contain other parameters after “https://secure.futureinnovate.net”.
Step 2.2: Specify Service
After logging in, select the “LCIF Stream 2 Technology Demonstration EOI” service. Click “Next” to proceed to the Main Menu.
5. Step 3: Entering your EOI content
The EOI is completed in six Parts:
- Part 1: Mandatory Requirements
- Part 2: Identification, Contact and Organization Information
- Part 3: Project Information
- Part 4: Technology Information
- Part 5: Commercialization Information
- Part 6: Applicant Self-Evaluation
To assist you in preparing to enter your responses, click here to access the complete text of the required EOI inputs. (will open in a separate window).
Begin from the Main Menu, as depicted opposite. Note that on the Main Menu, you may:
- Select your preferred language (may not apply to all Services)
- Specify a larger font size. Note that font size selections made here will also affect font size in PDF files that are generated for review purposes.
Each Part must be “created” and completed separately, as described in the next section below.
The Main Menu also includes a “EOI Completion Status” option. At any time, you may select this and click “Next” to view a summary of the completion / submission status of each EOI associated with your user account.
Step 3.1: Complete Part 1: Mandatory Requirements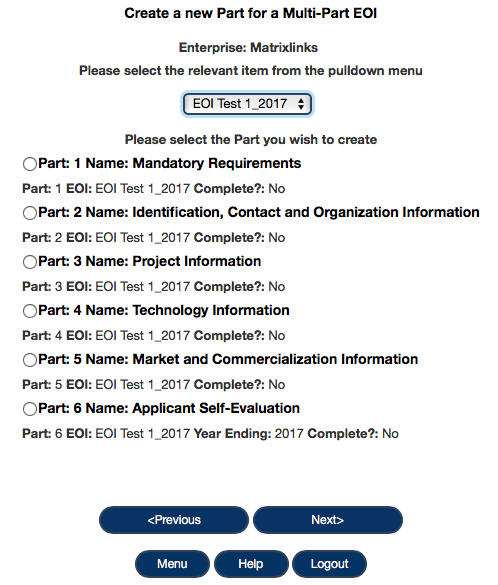
From the Main Menu, select “Create New Part for a Multi-Part EOI”. On the subsequent page depicted opposite, use the pull-down menu to select the LCIF EOI Name specified on registration. Click “Part 1”, and then click “Next”. Part 1 questions will all be presented on a single page. After responding to all Part 1 questions, click “Next” to save your data and return to the Main Menu.
If the pull-down menu does not include the LCIF EOI name or names you specified on registration, you may need to repeat step 1.5 above by returning to the registration page via the Online Registration link in Step 1.1 above, clicking “I am already registered for this service but wish to register another EOI”, entering your email address, and on the subsequent page providing your password and the requested EOI data.
Step 3.2: Complete Part 2: Identification, Contact and Organization Information
From the Main Menu, select “Create New Part for a Multi-Part EOI”. On the subsequent page depicted opposite, use the pull-down menu to select the LCIF EOI Name specified on registration. Click “Part 2”, and then click “Next”. Part 2 questions will all be presented on a single page. After responding to all Part 2 questions, click “Next” to save your data and return to the Main Menu.
Step 3.3: Complete Part 3: Project Information
From the Main Menu, select “Create New Part for a Multi-Part EOI”. On the next page, use the pull-down menu to select the LCIF EOI Name specified on registration. Click “Part 3”, and then click “Next”.
Part 3 inputs will each be presented in logical groupings with one or several inputs on a single page. The response to each page of inputs is saved when you click “Next” to move on to the next page of inputs.
In order to ensure completeness of submissions, in most cases the platform requires that all fields on a page be populated in order to accept input and populate the database. If a field is not relevant, insert “NA” in text fields or “0” in numeric fields. In many cases, the platform will prepopulate fields with “NA” or “0”. Where appropriate, you should overwrite the prepopulated data with your own inputs.
After responding to all Part 3 questions, click “Next” to return to the Main Menu.
Step 3.4: Complete Part 4: Technology Information
From the Main Menu, select “Create New Part for a Multi-Part EOI”. On the next page, use the pull-down menu to select the LCIF EOI Name specified on registration. Click “Part 4”, and then click “Next”.
Part 4 inputs will each be presented in logical groupings with one or several inputs on a single page. The response to each page of inputs is saved when you click “Next” to move on to the next page of inputs.
In order to ensure completeness of submissions, in most cases the platform requires that all fields on a page be populated in order to accept input and populate the database. If a field is not relevant, insert “NA” in text fields or “0” in numeric fields. In many cases, the platform will prepopulate fields with “NA” or “0”. Where appropriate, you should overwrite the prepopulated data with your own inputs.
After responding to all Part 3 questions, click “Next” to return to the Main Menu.
Step 3.5: Complete Part 5: Commercialization Information
From the Main Menu, select “Create New Part for a Multi-Part EOI”. On the next page, use the pull-down menu to select the LCIF EOI Name specified on registration. Click “Part 5”, and then click “Next”.
Part 5 inputs will each be presented in logical groupings with one or several inputs on a single page. The response to each page of inputs is saved when you click “Next” to move on to the next page of inputs.
In order to ensure completeness of submissions, in most cases the platform requires that all fields on a page be populated in order to accept input and populate the database. If a field is not relevant, insert “NA” in text fields or “0” in numeric fields. In many cases, the platform will prepopulate fields with “NA” or “0”. Where appropriate, you should overwrite the prepopulated data with your own inputs.
After responding to all Part 3 questions, click “Next” to return to the Main Menu.
Step 3.6: Complete Part 6: Self-evaluation Relative to Evaluation Criteria
 From the Main Menu, select “Create New Part for a Multi-Part EOI”. On the next page, use the pull-down menu to select the EOI Name specified on registration. Click “Part 6”, and then click “Next”.
Part 6 of the EOI consists of your responses related to the Evaluation Criteria for the LCIF EOI. These criteria will be used by expert reviewers in evaluating your EOI Submission. Benchmark statements (termed a Language Ladder) for each criterion form the basis for this evaluation.
The first question in Part 4 is depicted above or opposite. As a Self Evaluation, you select a letter grade using the Language Ladder pulldown opposite “Your Response” to specify the statement that best describes the relevant aspects of your proposed Project.
The EOI requires a justification of approximately 250 words providing your rationale for each response. You are strongly encouraged to prepare these ahead of time in an electronic format that can be pasted into the online form.
Repeat this process for each of the decision criteria.
After providing all Part 6 inputs, click “Next” to return to the Main Menu.
Step 3.7: Finish or Edit/Update a Part
If you need to logout before completing any of Parts 1 through 6, you may login again, select “Finish Incomplete Part for a Multi-Part EOI” from the Main Menu, then select the EOI you wish to complete, and the Part you wish to complete.
Alternatively, if you have completed any of Parts 1 through 6 and wish to edit your responses, select “Update Completed Part for a Multi-Part EOI” from the Main Menu, then select the EOI you wish to update, and the Part you wish to update. On the subsequent page, you may select the specific answer you wish to update.
6. Step 4: Review your draft EOI
Step 4.1: Review Draft EOI
After completing any of Parts 1 through 6, you may optionally choose to generate a PDF version of your draft EOI Submission for review purposes. This might be useful to enable you and your colleagues to review your responses prior to the final submission step. From the Main Menu, select “Review Draft EOI”. On the subsequent page, scroll to the bottom and click “Next”. The following page will provide a download link to the generated PDF. If on review you need to revise your responses, refer to the update instructions in step 3.7. You may also access review PDF documents from the Status Summary link on the Main Menu.
7. Step 5: Review and Submit the completed EOI
Step 5.1: Review and Submit Completed EOI
When all Parts are complete, return to the Main Menu and then select “Review and Submit Completed EOI”. Select the name of the EOI, and click “Next”.
Note that the platform will not permit an EOI to be submitted until all Parts are complete. If you are uncertain whether all Parts are complete, return to the Main Menu and access the EOI Status Summary to view the completion / submission status of all EOIs associated with your user account.
If your EOI is complete, you will be provided with a page that feeds back all your EOI responses. If you need to revise your responses, refer to the update instructions in step 3.7 above. When you are satisfied with your responses, scroll to the bottom of the “Review and Submit” page and follow the instructions for submitting your EOI.
IMPORTANT: DO NOT click “Submit” until you are satisfied that your EOI is complete. Once the “Submit” button is clicked at the bottom of the “Review and Submit” page, your EOI submission is FINAL. You will not be able to process updates or changes after clicking the “Submit” button on the “Review and Submit” page.
After you click the Submit button, you will be able to download a PDF version of your submission from the subsequent page. You may also access a submission PDF document from the Status Summary link on the Main Menu.
This section provides contact information for the LCIF Program and the LCIF EOI Service technical support.
For information about LCIF, contact:
lowcarboninnovationfund@ontario.ca
For technical assistance associated with the LCIF EOI Service, contact:
In your support request, it is important to indicate, by reference to the above instructions, the specific step with which you are having difficulty, and include any error messages or system alerts. To help us respond quickly to your issue, please ensure that the phrase “LCIF Help” appears in the subject line of your email. Note that solutions to common issues may be found on the futureInnovate Frequently-Asked Questions site.
NOTE: Technical Assistance support is restricted to issues associated with mechanics of the on-line system; specifically, Technical Assistance CAN NOT comment on or provide interpretation of LCIF details. All non-technical assistance for the LCIF EOI Service is to be directed to the LCIF contact cited above.
Copyright futureInnovate.net, BenchmarkAction Inc., and MatrixLinks International Inc., 2004-2017. All rights reserved.